Installing HSS
A - Install 'ffmpeg' (for details visit: https://lindevs.com/install-ffmpeg-on-raspberry-pi/)
Log into your Pi and open a terminal window and run the following commands:
cd $home
sudo apt install -y ffmpeg git
Note: 'git' is needed to allow the nodes from kevinGodell to install.
You can check the installed version of ffmpeg by entering this command
ffmpeg -version
B - Install Node-RED nodes
Run the following commands in a terminal window (IMPORTANT you must be in the .node-red folder to start)
cd ~/.node-red
npm install node-red-dashboard
npm install node-red-node-email
npm install node-red-contrib-cron-plus
npm install node-red-contrib-image-output
npm
install node-red-contrib-multipart-stream-decoder
npm install node-red-contrib-simple-gate
npm
install node-red-contrib-telegrambot
npm install node-red-contrib-tfjs-coco-ssd@1.0.3
npm
install @kevingodell/node-red-ffmpeg
npm install @kevingodell/node-red-mp4frag
C - Head over to the Downloads section of this website and download the zip file… hss_flow_file.zip to your computer.
Store it in a folder on your hard drive and then unzip it.
Import the unzipped file into Node-RED using Node-RED’s Import facility.
The first thing you need to do is create the directory filing structure that HSS needs in order to operate correctly.
There is a flow to organise all of this for you - go to the tab-flow labelled… HSS Setup SAS
Click the Inject node inside the box labelled STEP 1. This will download two scripts to /home/pi on your Raspberry Pi.
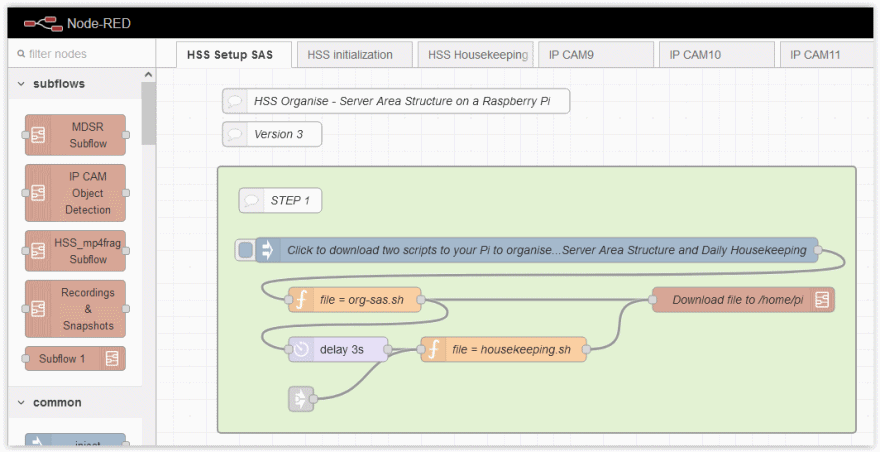
Move down to the box labelled STEP 2 and click the Inject node.
This action will run a script (org-sas.sh) that:
- Creates a main sub-directory where all the material related to HSS is stored/held. (i.e. hss_media)
- Populate the main sub-directory with a set of configuration files.
- Creates four sub-directories to hold ‘defaults’, ‘motions’, ‘recordings’ and ‘snapshots’
- Populates three of those sub-directories with the PHP program called Single File Gallery (SFG).
SFG is a program that manages media (photos and videos) in a highly automated way.
More details can be found on the author’s website.
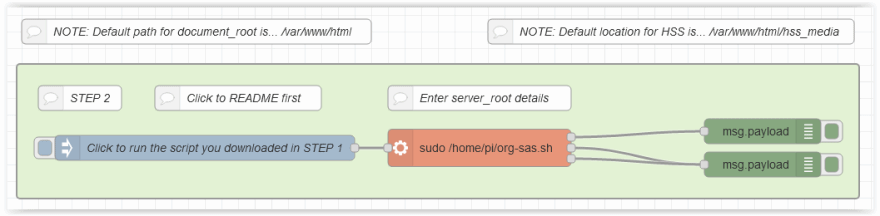
NOTE:
The script (org-sas.sh) assumes the document_root (as setup by NGINX) is… /var/www/html
If for some reason you have set document_root to a different location you can inform the script what it is by double-clicking the orange coloured ‘exec’ node and entering the details as follows.

Change /YOUR_path_to_doc_root to where YOUR document_root is located, then click [ Done ] and perform Step 2 again.
You should be able to start HSS and see if it operates correctly.
Go to the tab-flow labelled… HSS initialization and click the Inject node labelled ‘get the configuration file’.

This action should result in some video streams appearing in the small monitors and the main display area.
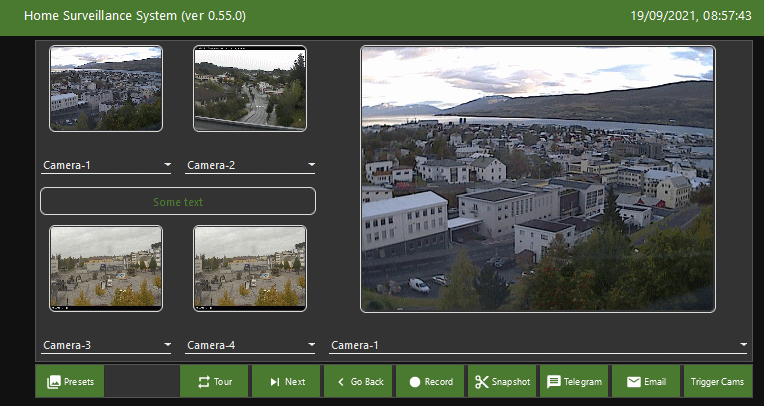
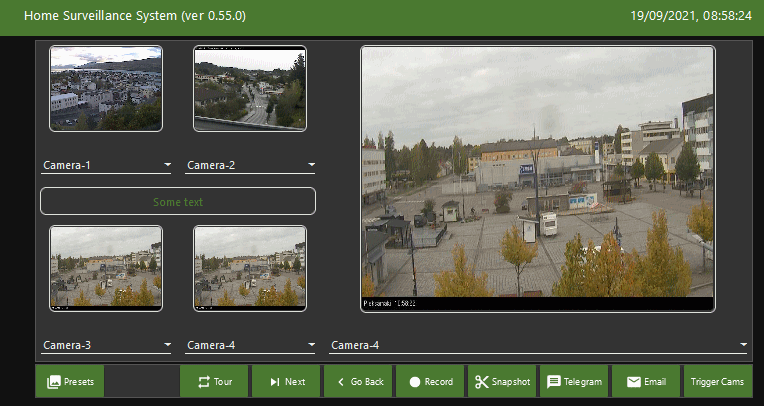
These streams are from cameras located in Scandinavia. If you do a mouse click in the middle of any of the small monitors then that stream will be mirrored to the main display area. Here’s an example of clicking Camera-4 in the small monitor.
Along the bottom edge of the main display area is a series of function buttons. At the moment only ‘Record’ and ‘Snapshot’ will work as the others need configuring - which will be explained in section: 4. Config file. At this stage try clicking the ‘Record’ button. The button’s background will turn red indicating a recording is being made. After a few seconds (approx 12-secs) the background will revert back to green - indicating the recording has been completed. You can find and view the recording by selecting ‘Show recordings’ from the drop-down and then the folder that relates to today’s date (i.e. day number). You can perform a similar action by clicking the ‘Snapshot’ button and then use the drop-down labelled ‘Show snapshots’ to see the snapshot.
Note: At this stage the ‘Telegram’ and ‘Email’ buttons won’t work as they haven’t been configured.
At the bottom of each of the five monitors is a drop-down menu that enables you to manually select what you want to appear.
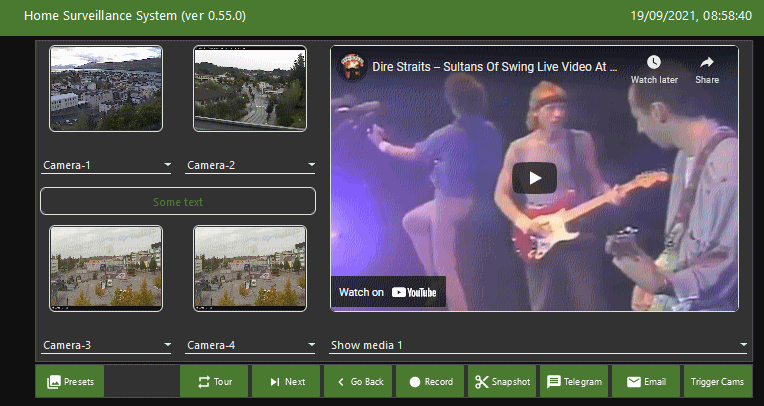
Here’s an example of selecting ‘Show media 1’ from the drop-down in the main display area.
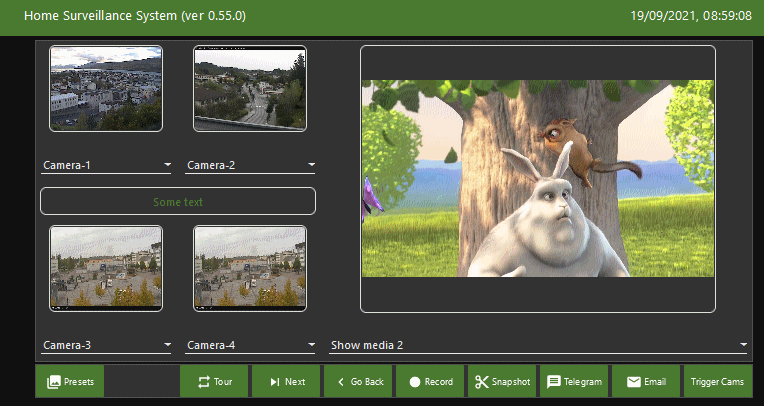
Here’s another example of selecting ‘Show media 2’ from the drop-down in the main display area.
Before we leave this section, let’s take a quick look at some of the other buttons. Starting from left to right - the first button labelled ‘Presets’ will feed camera streams to the five windows (as defined in the ‘hss_basic_config.txt’) to pre-set the visual layout to your personal preference. How to do this will be explained in section: 4. Config file.
The next button labelled ‘Tour’ will start an automatic sequence whereby the stream shown in the main display will cycle round a predefined sequence. Again, how to modify this sequence will be explained in section: 4. Config file. If you click the ‘Next’ button, whilst a tour is in progress, then the sequence will be advanced immediately to show the next camera stream.
The last button is labelled ‘< Go Back’. Its function is associated with ‘show’ menus and should be fairly obvious.
Once you have explored the functionality of the various buttons and have become familiar with how HSS works you should head over to section 4. Config file and customise HSS so it matches your needs.
The next step is to modify the ‘config’ file so it matches your requirements.
Go to… 4. Config
This is the recommended sequence to get HSS up-and-running quickly and easily.
Please take the time to read the material on these website pages and to perform the steps in the sequence 1 through to 4.
1. Requirements
This section explains about networks, the extra nodes you need
to install for Node-RED and some guidance on
cameras that work well with HSS.
2. NGINX
This section explains how to install NGINX, a web server, if you haven’t
got one already running on your computer.
3. Install <<< You are here
This section
is a step-by-step guide for the installation sequence of HSS (using the out-of-the
box config file)
4. Config file
This section is a detailed step-by-step guide,
explaining how to customise HSS to accept your cameras, etc..